HomeBlogHoliday Home DecorThe Ultimate Guide to Christmas Tree Decor Ideas That’ll Make Your Guests Swoon
The Ultimate Guide to Christmas Tree Decor Ideas That’ll Make Your Guests Swoon
Let’s be honest: the Christmas tree is the star of your holiday home. It’s your moment to flex your style, your personality, and your ability to wrangle twinkle lights without tears. If you’ve ever stared at your tree and thought, “Cute, but meh,” this guide is your upgrade. We’re talking high-impact ideas you can actually pull off—without a professional stylist or a ladder the size of a giraffe.
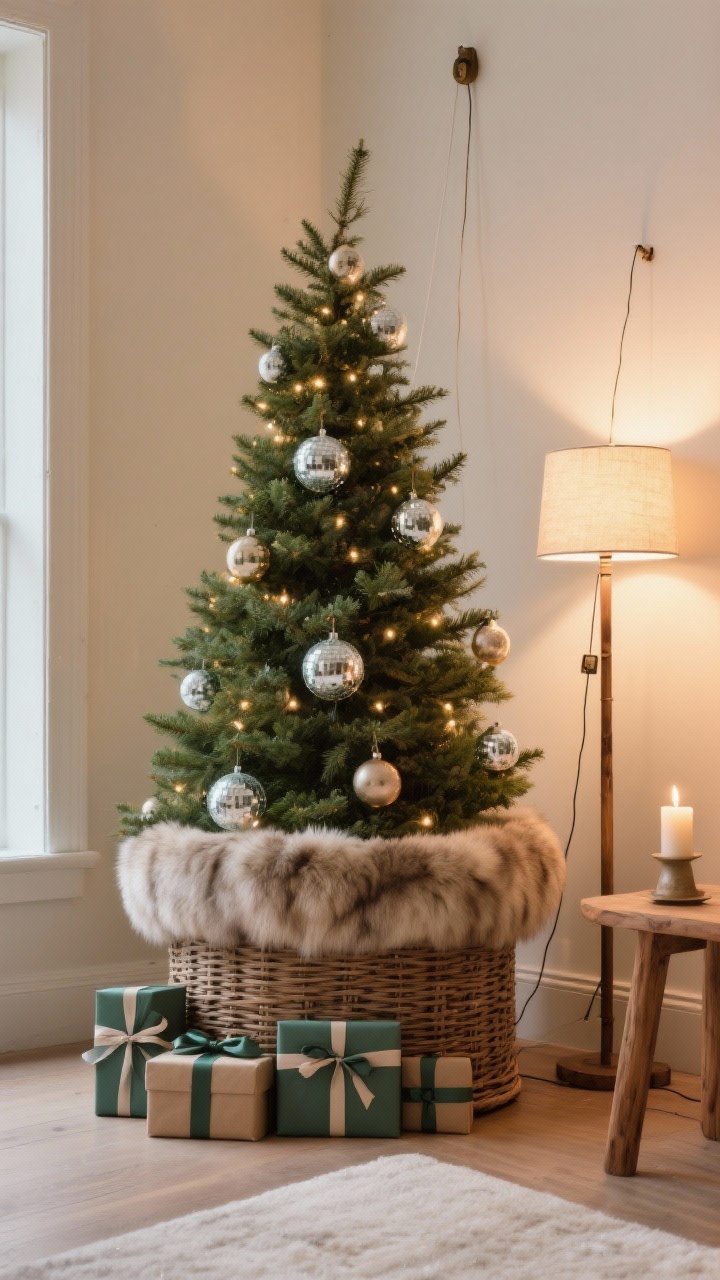
1. Build A Flawless Base: Lights, Structure, And Shape
You wouldn’t build a house without a solid foundation, right? Same with your tree. Start with lights, structure, and shape before you even peek at ornaments.
Pick Your Lights Like A Pro
Warm white is classic and cozy. Cool white is crisp and modern. Mixing both? That’s a glam hotel lobby vibe—use sparingly.
Use 100 lights per foot of tree (e.g., 700–800 lights for a 7.5-footer). If you love sparkle, add 25% more. YOLO.
Try the trunk-wrap method for depth: wrap lights tightly around the trunk, then weave out to the tips on each branch. Your tree will glow from within.
Layer in twinkle or sparkle strands with a slow fade setting. Avoid the rapid blink—unless your goal is a festive headache.
Shape Matters (Even Artificial Trees)
Fluff every branch. Bend tips upward, then fan them left-right for fullness. This is the Botox of tree styling, FYI.
Fill gaps with greenery picks (cedar, eucalyptus, pine). Tuck them deep to create volume and texture.
Choose the right width: Narrow trees are great for small spaces; full trees make a grand statement but need more decor.
Don’t Forget The Base
Use a tree collar for a modern look or a fabric skirt for something soft and traditional.
Hide the stand with a basket or a short barrel—pro tip: put the stand on a riser inside for extra height.
Goal: Even before ornaments, your tree should look rich, glowy, and lush.
“For a child’s bedroom Christmas tree, a Sweet Romantic Moon Lamp Floating Night Light on the nightstand can complement the festive glow.”
2. Pick A Theme That Doesn’t Feel Cheesy
Themes aren’t about matching everything like a department store display. They’re about editing—choosing a palette, a vibe, and sticking to it. You can be whimsical without going kindergarten craft hour.
Five Foolproof Vibes
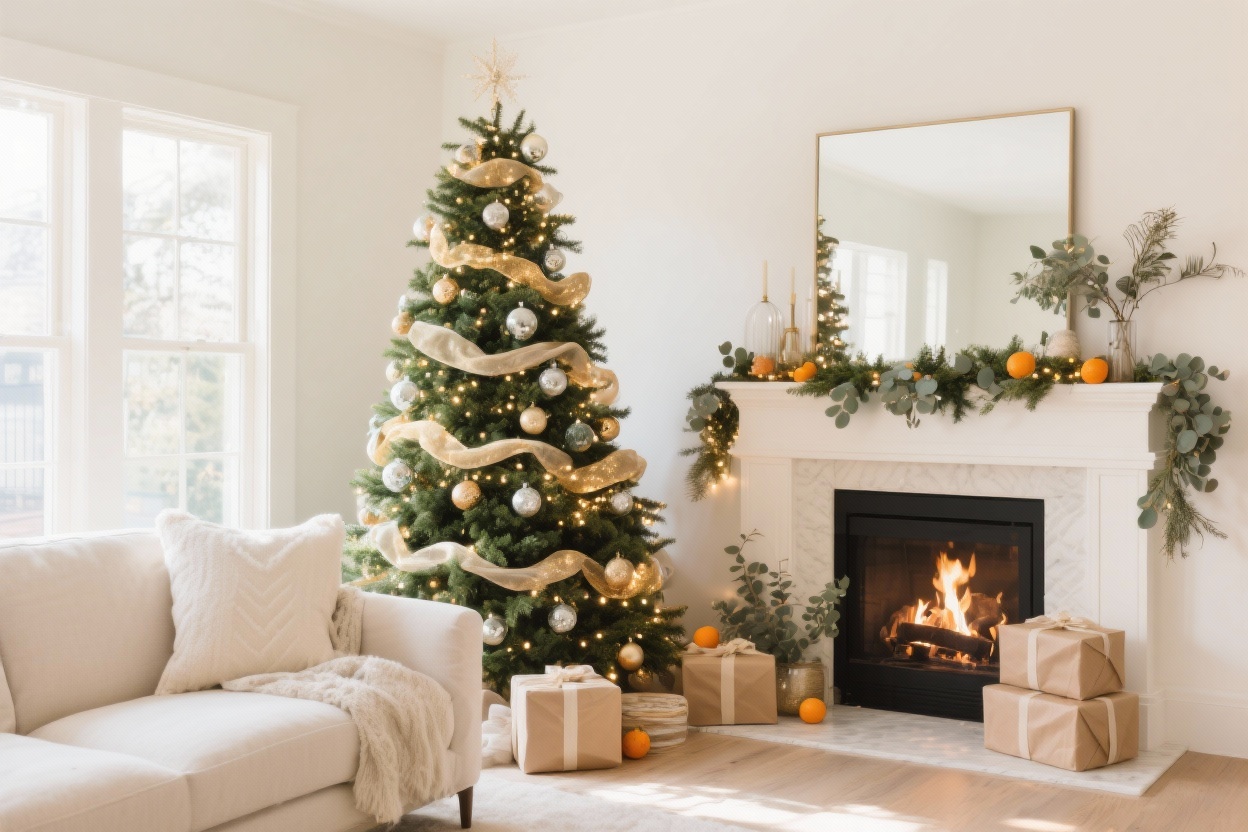
Nordic Neutral: Wood, linen, paper stars, warm white lights, minimal ribbons. Add dried orange slices for a subtle pop.
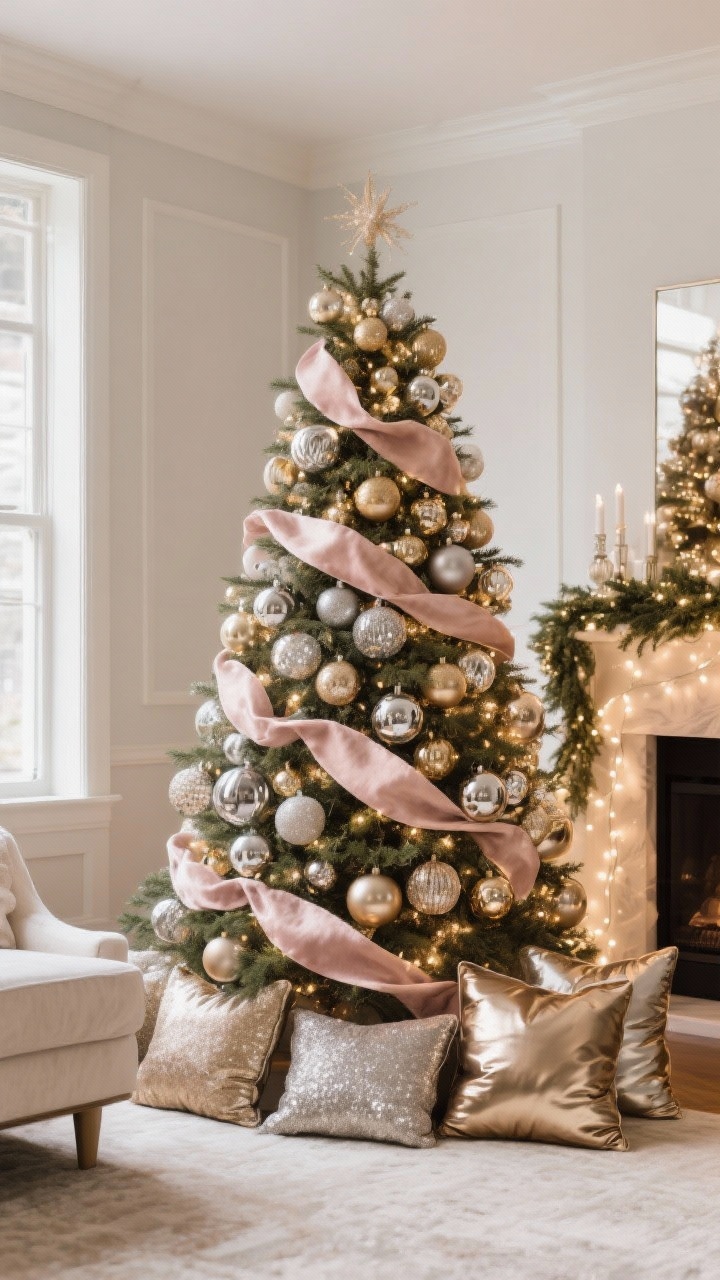
Glam Metallics: Champagne, gold, silver, and smoked glass. Use velvet ribbon and mercury glass ornaments. Go heavy on sparkle, light on color.
Moody Forest: Deep greens, charcoal, bronze, and forest animals. Mix matte and gloss finishes for dimension.
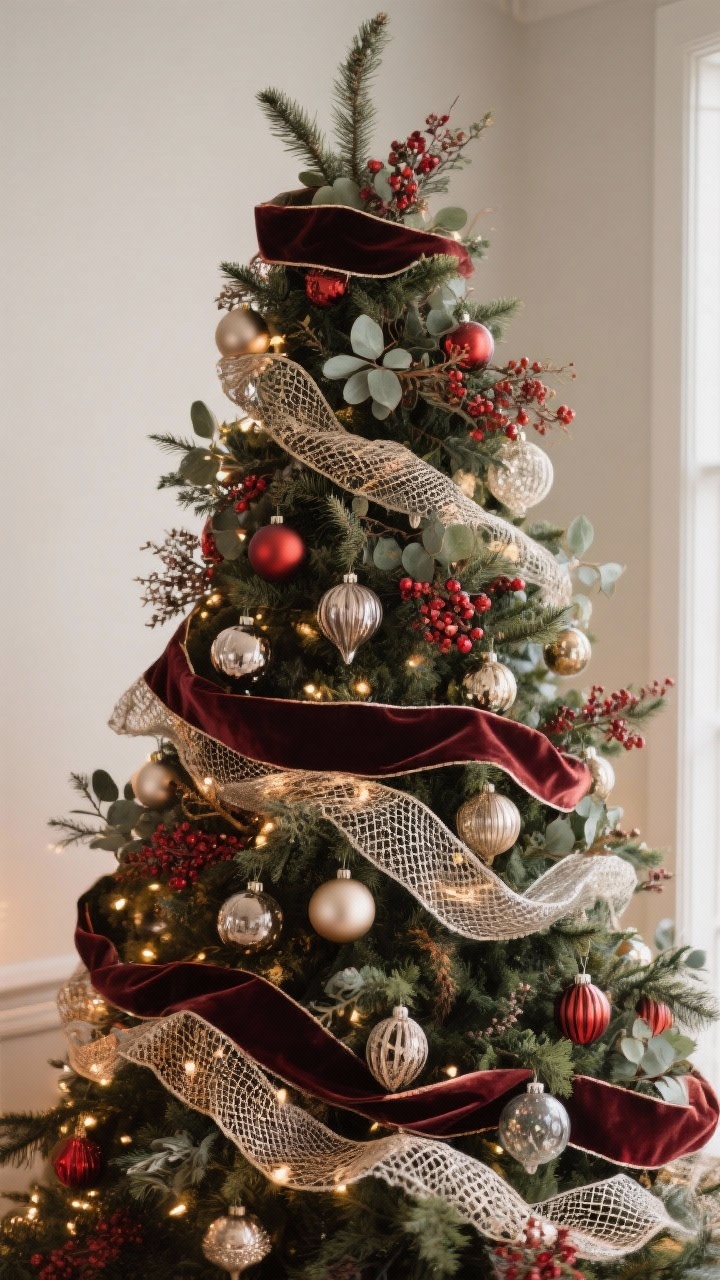
Candy Cane Classic: Red, white, and a hint of green. Striped ribbon, peppermint picks, and nostalgic bulbs. Cozy, cheerful, never fails.
Coastal Calm: Soft blues, sand, pearl, and natural rope or driftwood ornaments. Keep it airy and clean.
Build A Balanced Palette
Choose 1-2 main colors, 1 metallic, and 1 accent. Example: Emerald + black, gold metallic, with a blush accent.
Mix finishes: matte, gloss, glitter, and textured ornaments create depth.
Commit. If it doesn’t fit the vibe, it sits this year. Your sentimental pieces can still join—just cluster them in one dedicated section.
Pro Move: Repeat your theme around the room—mantel, garland, pillows—so the whole space feels intentional.
3. Layer Like A Stylist: Ribbons, Picks, And Ornament Strategy
This is where your tree goes from “nice” to “wow.” The secret? Layers. Don’t just hang ornaments. Build a look with textures and depth.
Ribbon: The Instant Upgrade
Use 2-3 types of ribbon: one wide (2.5–4 inches), one narrow, and one with texture (velvet, linen, mesh).
Try waterfall drapes: Cut 3–4 foot lengths, tuck deep, then billow out. Or go spiral from top to bottom.
Pro tip: Wire-edged ribbon holds shape. Mix solids with subtle patterns (pinstripe, plaid, or tone-on-tone).
Picks And Sprays: The Stylists’ Cheat Code
Layer greenery picks and sparkle sprays at the top third and edges for drama.
Use a mix: pine, eucalyptus, berries, and metallic branches. Vary lengths and finishes.
Cluster 2–3 picks together for a luxe look, then repeat around the tree in a zigzag.
Ornament Placement: The Rule Of Thirds
Base layer: Large matte bulbs (think 4–6 inches) deep inside the tree for depth.
Middle layer: Medium ornaments in your main colors. Spread evenly.
Top layer: Statement pieces: delicate glass, novelty ornaments, heirlooms. Place at eye level and outer tips.
Group in clusters of three. One large + one medium + one interesting shape = instant designer moment.
Step back every 10 minutes and adjust. Your eyes lie up close.
FYI: Odd numbers work best visually—go for 5, 7, 9 of any special item across the tree.
4. Make It Personal Without Ruining The Aesthetic
Sentimental doesn’t have to mean chaotic. You can display kid crafts, vacation ornaments, and hand-me-down angels without losing your chic vibe. It’s all in the styling.
Create Mini Galleries
Dedicate a memory zone on one side or a lower section for family-made ornaments. Cluster for impact rather than sprinkling randomly.
Use matching hooks or ribbons so everything looks intentional. Satin ribbon instantly elevates anything.
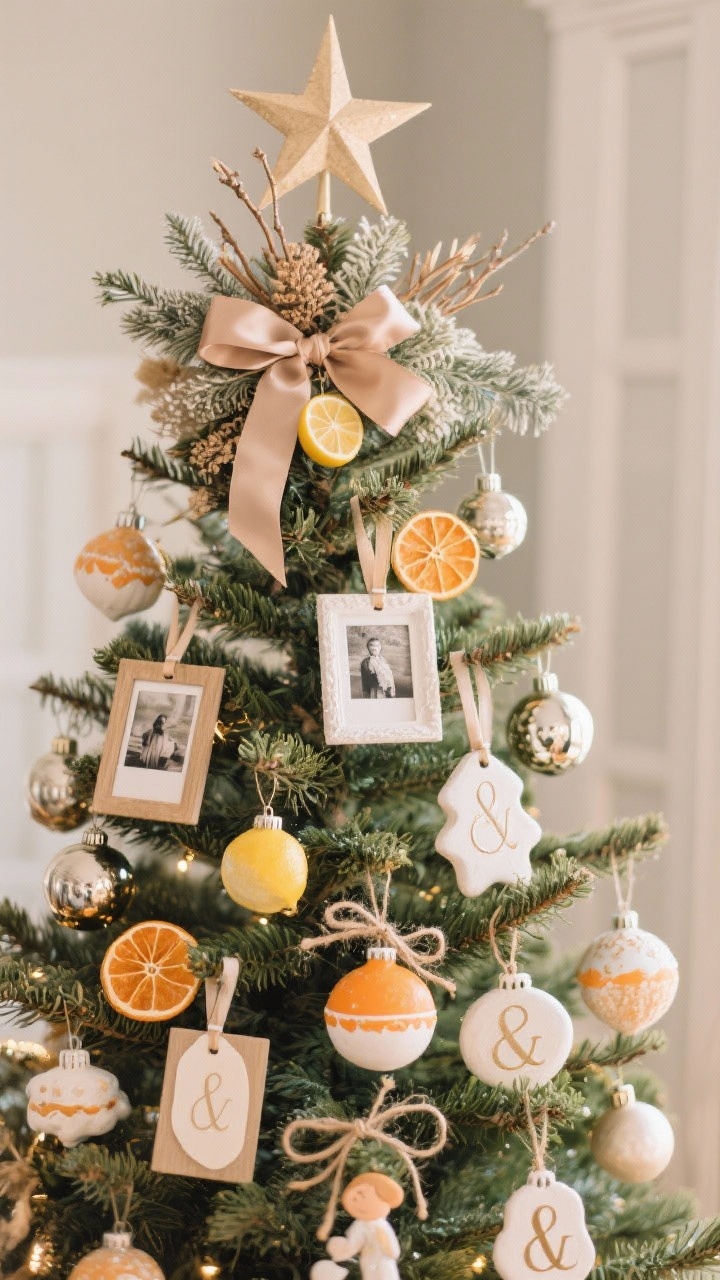
Frame tiny photos in ornament frames and mix with metallic bulbs to keep it cohesive.
DIY But Make It Chic
Dried citrus (orange, lemon) with twine adds warmth and smells amazing. Bake low and slow at 200°F until translucent.
Salt dough ornaments painted in your palette feel artisanal, not preschool.
Monogram tags on select branches make great conversation starters (and help kids “find their ornament” without relocating the entire tree).
Tree Topper, But Elevated
Skip the standard star if it’s not your vibe. Try a bouquet topper of sprays, bows, and branches for height.
If you love a star or angel, nestle it into a cluster of picks so it looks integrated, not plopped.
IMO: The sweetest trees tell a story. Add personalization in curated pockets and the whole thing sings.
5. Finish Strong: Skirts, Scents, And Photo-Ready Details
The last 10% makes it look pro. Think base styling, fragrance, and those little camera-ready touches that make guests ask, “Who did your tree?”
Dress The Base
Choose a tree skirt that matches your theme: faux fur for luxe, cable knit for cozy, burlap for rustic.
Use a tree collar for structure. Metal, wicker, or matte black are all high-impact choices.
Stage wrapped boxes in your color palette with coordinated ribbons. Empty is fine—it’s decor, not a lie.
Layer In Scent
Real tree? Trim a few branches for simmer pot or mantel garland. Instant pine heaven.
Artificial tree? Add scent sticks deep inside or use a subtle fir-cypress candle nearby. Don’t mix too many fragrances.
Make It Sparkle On Camera
Use a few mirror-ball or disco ornaments to bounce light back into the room. They’re basically ring lights for your tree.
Place a floor lamp or sconce nearby on a dimmer. Soft side lighting makes everything glow in photos.
Switch lights to a warm, steady setting for pictures. Fast twinkle can blur.
Safety And Sanity Checks
Plug lights into a smart plug so you can schedule on/off times. Saves energy and mood swings.
Keep breakable ornaments above pet and toddler height. Felt and wood go low, glass goes high.
Secure the tree with a fishing line tether to a wall hook if it’s in a high-traffic zone. Invisible, life-saving, you’re welcome.
Final flourish: Stand back, squint, and look for bald spots. Tuck in a few picks or ornaments and call it done before you overwork it.
Quick Shopping Checklist
Lights: warm white + optional twinkle strands
Ribbons: 2–3 styles, wire-edged
Picks/sprays: greenery + metallic accents
Ornament mix: large fillers, mediums, statement pieces
Topper components: traditional or bouquet style
Tree skirt/collar, scent, smart plug, extra hooks
You’ve got this. With a strong base, a clear vibe, and layered details, your Christmas tree will look like it stepped out of a magazine—without the “I cried into my ribbon” energy. Pour some cocoa, turn on your favorite playlist, and make some magic. Your most beautiful tree yet is totally happening this year.


Leave a comment